X macros is a conceptually simple, but still very powerful, coding technique to add to your toolbox. Do remember though — with great power comes great potential for overly complex, unmaintainable code.
This blog post explains the concept of X macros as well as a category of problems that can be solved by using this technique. Along the way, we provide some insight into how this technique is used in Trails from Zero’s PC and Nintendo Switch ports.
The Problem
Let’s first establish the problem we are tackling by using this technique. Practically any non-trivial application, especially a video game, consists of multiple components that work together to achieve some greater purpose. Often, these components need to be kept in sync for the whole application to be consistent.
Take Trails from Zero’s settings menu as an example. The settings menu contains various switches and sliders for the player to customize their experience. Naturally, the player’s configuration should persist across game sessions; meaning, we need to store the configured values to disk and load them the next time the game launches. For us developers, we also want a way to tweak settings directly without accessing the settings menu — even though the game might not correctly support this for all settings. This development feature speeds up the process of tracking down bugs tremendously.
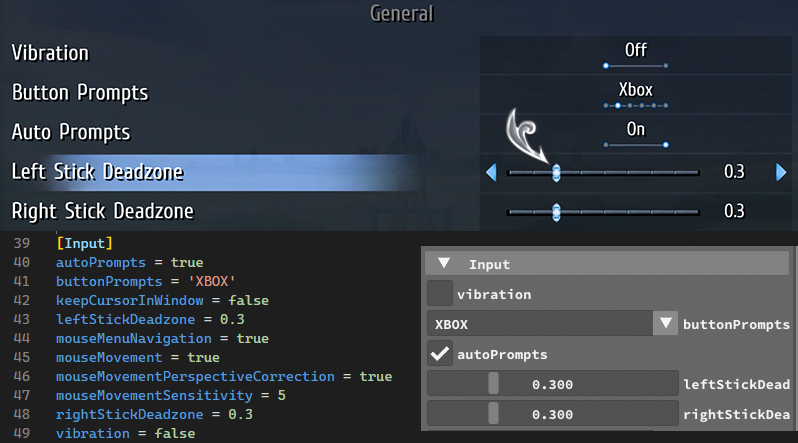
In the picture above you see the manifestation of the respective components: the settings menu with user intractable widgets (top), the corresponding content of the players’s settings file (bottom left), and a debug window for the developers / testers (bottom right).
The essential part here is that these components must be consistent. There must never be a setting, displayed in the settings menu, that is not also correctly stored to and loaded from the settings file.
Keeping these components in sync manually is cumbersome and error prone — so scratch that. Instead, we want a way to generate the implementations for these components from some definition, such that when we change the definition, the implementations change accordingly.
This approach falls under the Don’t repeat yourself (DRY) principle of software development.
Meet Reflection
Reflection, for the uninitiated, is a programming language’s mechanism to inspect the program itself and build or execute program code according to that inspection. Most commonly, reflection allows us to inspect data types and use this information in other parts of the program.
1
2
3
4
5
6
7
8
9
10
11
12
13
14
15
16
17
18
19
20
21
22
23
24
25
26
// This won't compile, it's just pseudo code.

struct Settings {
    bool vibration;
    bool autoPrompts;
    float leftStickDeadzone;
    float rightStickDeadzone;
};

void storeSettings(SettingsFile& file, const Settings& playerSettings)
{
    for (auto member : Settings.members) {
        // Stores key-value pairs, where the member's name (e.g. "vibration")
        // is used as key for the corresponding value.
        file.store(member.name, member.getValue(playerSettings));
    }
}

Settings loadSetting(SettingsFile& file)
{
    Settings playerSettings;
    for (auto member : Settings.members) {
        member.setValue(playerSettings, file.load(member.name));
    }
    return playerSettings;
}
The example above defines a data type Settings and functions for storing and loading instances of it. Reflection is used to iterate over the members of the type. When we add a new member to Settings, the new member will be stored and loaded along with all of the other members — no change inside the functions required!
Sadly C++, the programming language we are using, does not have a reflection mechanism. There exist third-party libraries that leverage bleeding edge language features and compiler specific hacks to enable some form of reflection for C++, but we’ll talk about them in a future blog post.
For now, we’ll be using something different. Something that has been around for decades and also works in C, not just C++.
Meet Reflection the Preprocessor
If you are a C/C++ programmer, you are likely already familiar with the preprocessor. For the unfamiliar reader: C and C++ are compiled languages, but their compilation toolchain features an additional step before compilation.
The following illustration outlines the compilation toolchain of a C/C++ program.
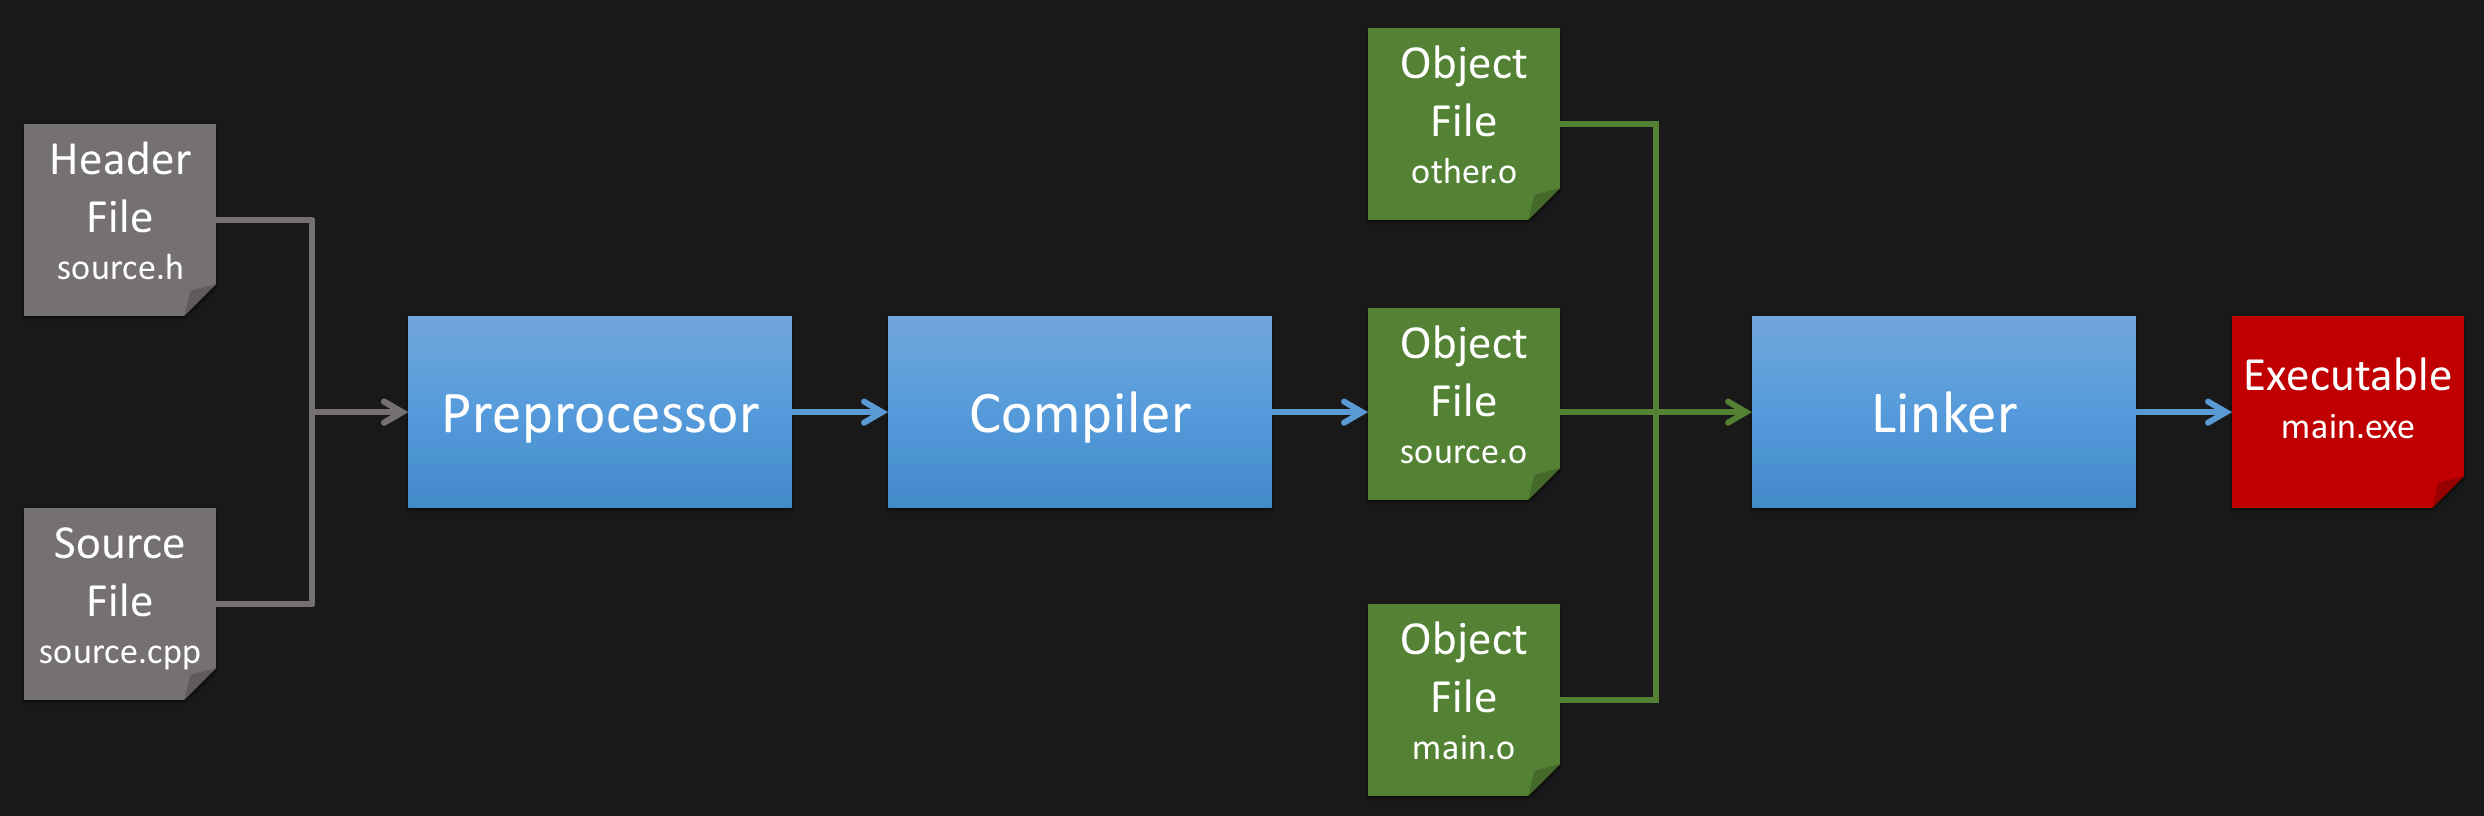
This preprocessor operates on the source code level, but has some very rough understanding of the C/C++ syntax. The main preprocessor directive we need for the X macros technique is #define. Most C/C++ compilers provide a way to print out the result of the preprocessor phase.
Here’s an example:
1
2
3
#define bar baz
#define foo bar
foo
Yields the following result, after the preprocessor:
1
baz
#define replaces the the first identifier (e.g. foo) with whatever comes after (e.g. bar). Yet, in this example we see two interesting features:
- Defines work transitively (
foo→bar→baz). - Even though
#define bar bazcomes before#define foo bar, both replacements are executed. You can swap the first 2 lines and still get the same result.
We still need another piece of preprocessor magic for the X macros technique though.
1
2
3
#define foo someFunction("Hello") someFunction("World")
#define someFunction(x) printf("%s\n", x);
foo
1
2
printf("%s\n", "Hello");
printf("%s\n", "World");
Defines can also take arguments, making them somewhat like functions. We commonly refer to such defines as macros.
In this example, we define foo to expand to two macro calls. Next, we define that macro to expand to printf("%s\n", x); where x is the argument.
This is actually our first X macro! Just instead of X we used someFunction as replaceable macro.
The clue: we can reuse the definition (foo) to generate different code.
1
2
3
4
5
6
7
8
9
10
11
12
13
#define foo X(vibration) X(leftStickDeadzone) X(rightStickDeadzone)

#define X(arg) print(arg);
foo
#undef X

#define X(arg) save(arg);
foo
#undef X

#define X(arg) load(arg);
foo
#undef X
1
2
3
4
5
6
7
8
9
10
11
print(vibration);
print(leftStickDeadzone);
print(rightStickDeadzone);

save(vibration);
save(leftStickDeadzone);
save(rightStickDeadzone);

load(vibration);
load(leftStickDeadzone);
load(rightStickDeadzone);
If we change the definition of foo, the 3 blocks are updated automatically.
“Woah”
— Keanu Reeves
Here’s a more practical example. Since X has a lot of potential to clash with an already existing symbol in a big code-base, we use more unique names for the defines:
1
2
3
4
5
6
7
8
9
10
11
12
13
14
15
16
#define ENUM_ToneMapping \
    ENUM_ENTRY(None) \
    ENUM_ENTRY(Uncharted2) \
    ENUM_ENTRY(ACES)

enum class ToneMapping {
#define ENUM_ENTRY(entry) entry,
    ENUM_ToneMapping
#undef ENUM_ENTRY
};

constexpr std::size_t ToneMappingCount = 0
#define ENUM_ENTRY(entry) +1
    ENUM_ToneMapping
#undef ENUM_ENTRY
;
1
2
3
enum class ToneMapping { None, Uncharted2, ACES, };

constexpr std::size_t ToneMappingCount = 0 +1 +1 +1;
If we modify ENUM_ToneMapping by adding or removing another macro invocation, the enum ToneMapping and the constant ToneMappingCount remain consistent.
Getting Organized
So far we’ve seen X macros used inline. To improve organization and readability, we move the definition to a dedicated file and include that at every location where code needs to be generated. We put the #undef inside that file as well as some documentation. Even further, we provide a default definition for each X macro to expand to nothing. This allows one to only define the X macros you need and simply ignore the ones you don’t need. The file extension .inc is used to distinguish these files from regular C/C++ files.
1
2
3
4
5
6
7
8
9
10
// Documentation goes here.
#ifndef TONE_MAPPING
#define TONE_MAPPING(name)
#endif

TONE_MAPPING(None)
TONE_MAPPING(Uncharted2)
TONE_MAPPING(ACES)

#undef TONE_MAPPING
1
2
3
4
5
6
7
8
9
enum class ToneMapping {
#define TONE_MAPPING(name) name,
#include "tone_mapping.inc"
};

constexpr std::size_t ToneMappingCount = 0
#define TONE_MAPPING(name) +1
#include "tone_mapping.inc"
;
Before we take a peek at Trails from Zero’s code, some advice when using X macros:
- All preprocessor defines are global. Add a prefix to make them unique among your code-base.
- String literals next to each other are concatenated automatically (e.g.
"foo" "bar"→"foobar"). - The preprocessor can convert a macro’s argument into a string literal by using
#. - Macro arguments can be concatenated with other identifiers by using
##. - Macros can accept a variable number of arguments by using
...and__VA_ARGS__.
The Real Deal
Here’s an excerpt of Trails from Zero’s settings definition file — the file that defines all player adjustable settings across the whole code-base.
1
2
3
4
5
6
7
8
9
10
11
12
13
14
15
16
17
18
19
20
21
22
23
24
25
26
27
28
29
30
31
32
33
34
35
36
37
38
39
40
41
42
43
44
45
46
47
// A simple toggle switch.
#ifndef PH3_SETTINGS_SWITCH
#define PH3_SETTINGS_SWITCH(_name, _default)
#endif

// A numeric slider with lower and upper bound.
#ifndef PH3_SETTINGS_SLIDER
#define PH3_SETTINGS_SLIDER(_name, _default, _minimum, _maximum)
#endif

// One selection out of multiple options. This creates a corresponding enum with
// to_string and from_string support.
#ifndef PH3_SETTINGS_ENUM_BEGIN
#define PH3_SETTINGS_ENUM_BEGIN(_name, _enum, _default)
#endif
#ifndef PH3_SETTINGS_ENUM_ENTRY
#define PH3_SETTINGS_ENUM_ENTRY(_name, _enum, _entry)
#endif
#ifndef PH3_SETTINGS_ENUM_END
#define PH3_SETTINGS_ENUM_END(_name, _enum)
#endif

// Definition Start

PH3_SETTINGS_SWITCH(vibration, true)

PH3_SETTINGS_ENUM_BEGIN(buttonPrompts, ButtonPrompts, XBOX)
PH3_SETTINGS_ENUM_ENTRY(buttonPrompts, ButtonPrompts, MKB)
PH3_SETTINGS_ENUM_ENTRY(buttonPrompts, ButtonPrompts, XBOX)
PH3_SETTINGS_ENUM_ENTRY(buttonPrompts, ButtonPrompts, PS)
PH3_SETTINGS_ENUM_ENTRY(buttonPrompts, ButtonPrompts, SteamDeck)
PH3_SETTINGS_ENUM_ENTRY(buttonPrompts, ButtonPrompts, STADIA)
PH3_SETTINGS_ENUM_ENTRY(buttonPrompts, ButtonPrompts, SWITCH)
PH3_SETTINGS_ENUM_END(buttonPrompts, ButtonPrompts)

PH3_SETTINGS_SWITCH(autoPrompts, true)

PH3_SETTINGS_SLIDER(leftStickDeadzone, 0.3, 0.1, 0.9)
PH3_SETTINGS_SLIDER(rightStickDeadzone, 0.3, 0.1, 0.9)

// Definition End

#undef PH3_SETTINGS_SWITCH
#undef PH3_SETTINGS_SLIDER
#undef PH3_SETTINGS_ENUM_BEGIN
#undef PH3_SETTINGS_ENUM_ENTRY
#undef PH3_SETTINGS_ENUM_END
Most importantly, this definition is used to build the Settings class, which stores the player’s current configuration. The next snippet shows the definition of this class and its serialization (i.e. what is saved to and loaded from the settings file).
1
2
3
4
5
6
7
8
9
10
11
12
13
14
15
16
17
18
19
20
21
22
23
24
25
26
class Settings {
  public:
    static Settings& get();

#define PH3_SETTINGS_SWITCH(_name, _default) Switch _name = Switch(_default);

#define PH3_SETTINGS_SLIDER(_name, _default, _minimum, _maximum) \
    Slider<decltype(_default)> _name = Slider(_default, _minimum, _maximum);

#define PH3_SETTINGS_ENUM_BEGIN(_name, _enum, _default) EnumSelection<_enum> _name = EnumSelection(_enum::_default, {
#define PH3_SETTINGS_ENUM_ENTRY(_name, _enum, _entry)       {_enum::_entry},
#define PH3_SETTINGS_ENUM_END(_name, _enum)             });

#include "ph3_settings_definition.inc"

    template <typename Serializer>
    void serialize(Serializer& s)
    {
#define PH3_SETTINGS_SWITCH(_name, _default)                     s.field(#_name, _name);
#define PH3_SETTINGS_SLIDER(_name, _default, _minimum, _maximum) s.field(#_name, _name);
#define PH3_SETTINGS_ENUM_BEGIN(_name, _enum, _default)          s.field(#_name, _name);
#include "ph3_settings_definition.inc"
    }

    // …
};
Expanded Code …
1
2
3
4
5
6
7
8
9
10
11
12
13
14
15
16
17
18
19
20
21
22
23
24
25
26
27
28
29
30
31
32
class Settings {
  public:
    static Settings& get();

    Switch vibration = Switch(true);

    EnumSelection<ButtonPrompts> buttonPrompts = EnumSelection(ButtonPrompts::XBOX, {
        {ButtonPrompts::MKB},
        {ButtonPrompts::XBOX},
        {ButtonPrompts::PS},
        {ButtonPrompts::SteamDeck},
        {ButtonPrompts::STADIA},
        {ButtonPrompts::SWITCH},
    });

    Switch autoPrompts = Switch(true);

    Slider<decltype(0.3)> leftStickDeadzone = Slider(0.3, 0.1, 0.9);
    Slider<decltype(0.3)> rightStickDeadzone = Slider(0.3, 0.1, 0.9);

    template <typename Serializer>
    void serialize(Serializer& s)
    {
        s.field("vibration", vibration);
        s.field("buttonPrompts", buttonPrompts);
        s.field("autoPrompts", autoPrompts);
        s.field("leftStickDeadzone", leftStickDeadzone);
        s.field("rightStickDeadzone", rightStickDeadzone);
    }

    // …
};
The serialize template member function is a common serialization paradigm in C++. See Boost Serialization or cereal.
The Settings class, being a singleton, is easily accessible across the whole code-base. Here’s how the input module uses the currently configured deadzone value:
1
2
const auto& settings = ph3::Settings::get();
applyRadialDeadzone(&input.sThumbLX, &input.sThumbLY, settings.leftStickDeadzone);
The code for putting together the settings UI is actually straight forward. The heavy lifting of creating a single widget is done by a UIFactory, we just need to invoke it for every setting in the definition. makeSetting creates the widget corresponding to the given argument type (Switch, Slider, EnumSelection, etc.).
1
2
3
4
5
6
7
8
9
10
11
12
SettingsWindow::SettingsWindow(const Settings& settings) {
    #define PH3_SETTINGS_SWITCH(_name, _default) \
        m_currentPage->addRow(UIFactory::makeSetting(settings._name));

    #define PH3_SETTINGS_SLIDER(_name, _default, _minimum, _maximum) \
        m_currentPage->addRow(UIFactory::makeSetting(settings._name));

    #define PH3_SETTINGS_ENUM_BEGIN(_name, _enum, _default) \
        m_currentPage->addRow(UIFactory::makeSetting(settings._name));

    #include "ph3_settings_definition.inc"
};
Expanded Code …
1
2
3
4
5
6
7
8
SettingsWindow::SettingsWindow(const Settings& settings)
{
    m_currentPage->addRow(UIFactory::makeSetting(settings.vibration));
    m_currentPage->addRow(UIFactory::makeSetting(settings.buttonPrompts));
    m_currentPage->addRow(UIFactory::makeSetting(settings.autoPrompts));
    m_currentPage->addRow(UIFactory::makeSetting(settings.leftStickDeadzone));
    m_currentPage->addRow(UIFactory::makeSetting(settings.rightStickDeadzone));
};
The ImGui-based debug UI is generated by the following code.
1
2
3
4
5
6
7
8
9
10
11
12
13
14
15
16
17
18
19
20
21
22
23
24
25
26
27
28
29
30
31
32
33
34
35
36
// ImGui combo boxes can be populated using a single string containing all
// entries, each followed by a null byte.
#define PH3_SETTINGS_ENUM_BEGIN(_name, _enum, _default) const char* _name##_entries =
#define PH3_SETTINGS_ENUM_ENTRY(_name, _enum, _entry)       #_entry "\0"
#define PH3_SETTINGS_ENUM_END(_name, _enum)             ;
#include "ph3_settings_definition.inc"

ImGui::Begin("PH3 Settings")

#define PH3_SETTINGS_SWITCH(_name, _default) \
    { \
        auto value = settings._name.get(); \
        if (ImGui::Checkbox(#_name, &value)) { \
            settings._name = value; \
        } \
    }

#define PH3_SETTINGS_SLIDER(_name, _default, _minimum, _maximum) \
    { \
        auto value = settings._name.get(); \
        if (ImGui::SliderFloat(#_name, &value, _minimum, _maximum)) { \
            settings._name = value; \
        } \
    }

#define PH3_SETTINGS_ENUM_BEGIN(_name, _enum, _default) \
    { \
        auto index = static_cast<int>(settings._name.get()); \
        if (ImGui::Combo(#_name, &index, _name##_entries)) { \
            settings._name = static_cast<_enum>(index); \
        } \
    }

#include "ph3_settings_definition.inc"

ImGui::End();
Expanded Code …
1
2
3
4
5
6
7
8
9
10
11
12
13
14
15
16
17
18
19
20
21
22
23
24
25
26
27
28
29
30
31
32
33
34
35
36
37
38
39
40
// ImGui combo boxes can be populated using a single string containing all
// entries, each followed by a null byte.
const char* buttonPrompts_entries = "MKB" "\0"
                                    "XBOX" "\0"
                                    "PS" "\0"
                                    "SteamDeck" "\0"
                                    "STADIA" "\0"
                                    "SWITCH" "\0";
ImGui::Begin("PH3 Settings")
{
    auto value = settings.vibration.get();
    if (ImGui::Checkbox("vibration", &value)) {
        settings.vibration = value;
    }
}
{
    auto index = static_cast<int>(settings.buttonPrompts.get());
    if (ImGui::Combo("buttonPrompts", &index, buttonPrompts_entries)) {
        settings.buttonPrompts = static_cast<ButtonPrompts>(index);
    }
}
{
    auto value = settings.autoPrompts.get();
    if (ImGui::Checkbox("autoPrompts", &value)) {
        settings.autoPrompts = value;
    }
}
{
    auto value = settings.leftStickDeadzone.get();
    if (ImGui::SliderFloat("leftStickDeadzone", &value, 0.1, 0.9)) {
        settings.leftStickDeadzone = value;
    }
}
{
    auto value = settings.rightStickDeadzone.get();
    if (ImGui::SliderFloat("rightStickDeadzone", &value, 0.1, 0.9)) {
        settings.rightStickDeadzone = value;
    }
}
ImGui::End();
There’s actually another component that depends on the settings definition: the localizer. The localizer stores translations for UI strings (i.e text). Each UI string is associated with a specific translation key. Each settings widget uses multiple of these keys, one for each UI string that is associated with the setting (e.g. description).
The X macro technique is used to automatically add translation keys to the enum defining all translation keys. The translated strings are read from a text file at the start of the game. Here the English key-to-string mapping for the vibration setting:
1
2
3
MESS_SETTINGS_LABEL_vibration:"Vibration"
MESS_SETTINGS_DESCRIPTION_ON_vibration:"Controller vibration enabled."
MESS_SETTINGS_DESCRIPTION_OFF_vibration:"Controller vibration disabled."
The common alternative
There also exists a different technique for solving the same problem that we should mention. Instead of using the C/C++ preprocessor for code generation, many projects use a scripting language (e.g. Python or Ruby) as custom preprocessor. Scripts are invoked by the build system, before the actual code compilation happens. Take a peek at O3DE’s respective documentation.
The main benefit of this alternative approach is that a general purpose scripting language has far fewer limitations than the C/C++ preprocessor. The X macro approach sometimes requires non-trivial workarounds to achieve certain things — if possible at all. This rarely happens when using scripting languages.
On the contrary side, adding another language to your project increases complexity by a substantial amount. Developers have to learn, understand, and use this other language in addition to the main language. Furthermore, the scripting language becomes a build dependency and building the project now requires an additional phase that is completely custom to that project.
Conclusion
In this post, we’ve explored a powerful preprocessor technique known as X macros to generate code at various places from a single source of truth. For Trails from Zero, this technique allows us to add a new setting by adding just a few lines to the settings definition file. Settings UI, debug UI, serialization, and the localizer remain consistent.
Nevertheless, as powerful as this technique is, it isn’t omnipotent; there are limitations to be aware of:
All limitations of the preprocessor also apply to this technique, for instance:
Preprocessor macro expansion does not directly support loops. There are workarounds where macros can be recursive, but this quickly becomes hard to maintain.
Another limitation is that macro arguments cannot be transformed. For example, changing an identifier from lower case to upper case is simply not possible with the standard preprocessor.
IDEs often have a hard time parsing macro expansions correctly.
Despite the generated code being correct, your IDE might struggle to correctly interpret the source code. Syntax highlighting and go to definition commands are the most common features that break.
Even when go to definition functionality is working, executing it on a symbol generated by a macro might not take you to the location you are actually interested in.
Similar issues arise when trying to step through macro-generated code using a debugger.
There’s no way to only expand certain macros, but not others. You’ll always get the full expansion of all macros.
While most compilers allow you to inspect the preprocessed source code, accessing this feature from a complex project setup might be hard. The same compile flags as for regular compilation must be provided (compile definitions, include paths, etc.), otherwise the macro-generated code might be different.
Still, in a lot of cases, the benefits of keeping components in sync is well worth the tradeoffs here.
We hope you found this rundown interesting and are considering to give X macros a try. Until a better alternative (C++ static reflection) becomes available, we will continue to employ X macros where it makes sense.